
Chapter 18

Auto-Labeling Script – Device Setup

Complete one-time device setup, token configuration, and script parameters to authenticate and communicate with the TensorAct platform without manual OTP entry.

Role Access Requirement
Access: Only users with the API User role have access to perform these device setup steps and run the auto-labeling script.

Overview

Before running the auto-labeling script on a device, complete the following one-time setup steps. These steps configure the device token and model script so that the script can authenticate and communicate with the TensorAct platform without requiring manual OTP entry on every run.

Step 1: API User Login

1

Open Application

Open the TensorAct application in your browser.

2

Navigate to Login

Go to the Login page.

3

Enter Credentials

Enter the API user’s credentials (Email and Password).

4

Enter OTP (if requested)

If an OTP is requested, enter the OTP received for the API user.

5

Remember this device

Enable Remember this device during login.

6

Verify Login

Complete the login and verify that you have successfully logged in to the application.

Tip: Remember Device
Enabling Remember this device helps avoid triggering an OTP for every subsequent login from the same device/browser.

Step 2: Update Device Token

After successfully logging in, follow the steps below to retrieve and update the device token.

A. Open Developer Tools

7

Right-Click Page

Right-click anywhere on the application page.

8

Select Inspect

Select Inspect.

9

Developer Tools Window

The Developer Tools window will open.

10

Application Tab

Go to the Application tab.

B. Locate the Device Token

11

Check Local Storage

In the Application tab, check the sections on the left side, such as Local Storage.

12

Select Domain

Select the domain/environment where the TensorAct application is running.
– Look for an entry with a key matching the pattern: fmn_*device*_token

13

Locate Entry

Locate the entry containing the device token.

14

Copy Token Value

Copy the device token value.
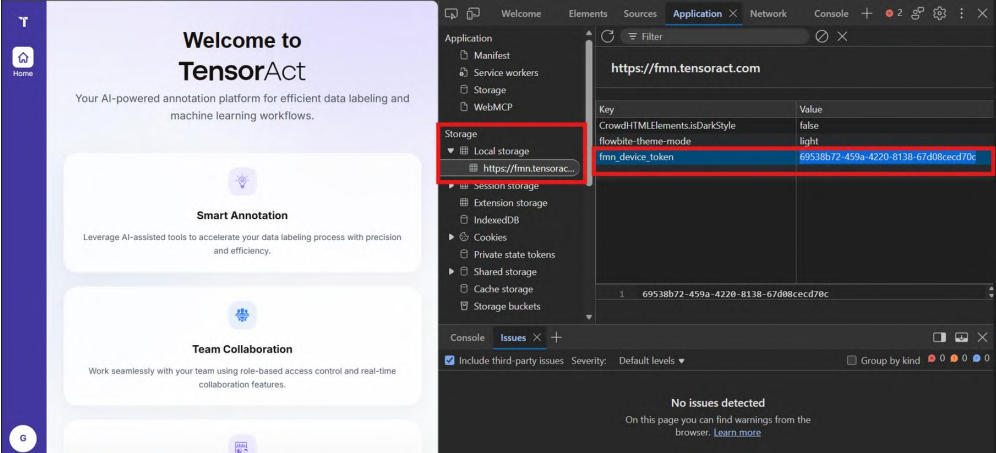
Figure 96: Developer Tools — Locating the Device Token in Local Storage

Figure 1: Developer Tools — Locating the Device Token in Local Storage

C. Update plugin_client.py

15

Open Repository

Open the project/code repository.

16

Locate File

Locate the file: plugin_client.py.

17

Find Configuration

Find the configuration/value where the device token is defined.

18

Replace Token

Replace the existing device token with the newly retrieved device token.

19

Save File

Save the file.

Step 3: Update Model Script Configuration

20

Open Model Script

Open the model script in the project/code repository.
– PLUGIN_NAME must match the name as in the workflow configuration.

21

Update Pathway ID

Update the Pathway ID in the model script.

22

Obtain Pathway ID

The Pathway ID can be obtained from the workflow configured for the respective project.

23

Update API Credentials

Update the API user’s credentials in the script as required.

24

Save Script

Save the updated model script.

Step 4: Project ID

25

Identify Project ID

Identify the Project ID for the project where the workflow is configured.

26

Locate in URL

The Project ID is the number displayed at the end of the project’s URL.
Example: https://<host>/projects/123 → Project ID = 123

Release notes - 2026

What’s New in 0.9 — new capabilities, refinements, and fixes, in the order they landed.

v0.9 October 6, 2026

Dataset File View

Location: 5. Dataset Setup and Management

We’ve introduced a new Dataset File View in TensorAct, making it easier to browse, preview, and manage files within a dataset. Users can now switch between the existing List view and the new View tab, which displays files as thumbnails with file previews, file names, and quick actions. The new File Viewer allows users to preview files and navigate between them using Previous and Next controls, while supporting file-specific viewing for Images, PDF, PDFOCR, TEXT, CSV, Audio, and Video files. Pagination and items-per-page controls make it easier to navigate large datasets, while file selection allows users to select and delete multiple files directly from the View tab. Additional controls such as file-name copying, media playback, progress tracking, and audio controls provide a more convenient and efficient dataset file management experience.

Change Task Stage from the Project Task List

Location: 8. Projects and Task Management

Project managers and administrators can now quickly change the stage of multiple tasks directly from the Project Task List. By selecting one or more tasks, users can transition tasks to different stages without needing to open each task individually. This enhancement significantly speeds up project management workflows and bulk task tracking.

Azure Blob Storage Integration

Location: 7. Integrations

TensorAct now supports direct integration with Azure Blob Storage. Users can securely connect their Azure storage accounts using either a Shared Access Signature (SAS) Token or a Service Principal. Once connected, users can browse their Azure storage containers directly from the TensorAct interface, select specific folders, and seamlessly import large batches of files into their datasets.

Reviewer Feedback and Pinned Feedback Management

Location: 8. Projects and Task Management

We’ve enhanced the feedback loop between annotators and reviewers. Reviewers can now add detailed feedback and pin specific issues directly to task items. The new issue management panel allows annotators to see all pinned feedback at a glance, reply to comments, and resolve issues systematically, ensuring higher data quality and clearer communication during the review process.

Email Notification Triggers

Location: 17. Email Templates

Administrators can now configure automated email notification templates and triggers. Located in the Settings menu, this feature allows you to customize the content of emails sent to users based on specific system events, keeping project teams instantly informed about task assignments, stage changes, and critical updates.

Uploading and Importing Files

Location: 6. File Management

We have introduced clearer guidelines and limits for file uploads to ensure optimal performance. Users uploading files from their local device can select and upload up to 100 files at a time. For larger batch imports, users leveraging our cloud storage integrations (AWS S3, Google Cloud Storage, or the new Azure Blob Storage) can import up to 25,000 files in a single action.

Removed

No sections removed in this release.

Code copied to clipboard!