

Single Sign-On (SSO) Integration
Integrate enterprise Identity Providers (IdP) via standard OpenID Connect (OIDC) or Microsoft ADFS, configure automated Just-In-Time (JIT) provisioning, and sign in seamlessly.
Overview
Tensoract supports any standard OIDC-compliant identity provider, including Google Workspace, Microsoft Azure AD (Entra ID), Okta, and Microsoft ADFS.
- Automatic User Creation (JIT Provisioning): When Allow Auto Provision is enabled for an SSO provider, corporate users who authenticate for the first time will have their Tensoract account automatically created with a pre-configured default role.
SSO Admin Setup (via Settings > SSO in the sidebar)
Company Admins and Super Users can register an Identity Provider by clicking Add Provider and completing the configuration form:
| Field | Description & Specification |
|---|---|
| Provider Name | Enter a human-readable display label (e.g. Google Workspace,
Azure AD Corporate).
|
| Provider Type | Select OIDC for modern OpenID Connect providers or ADFS for on-premise
Microsoft ADFS 2016+. |
| Issuer URL | Enter the IdP's OIDC discovery endpoint URL: Google: https://accounts.google.comAzure AD: https://login.microsoftonline.com/{tenant-id}/v2.0
|
| Client ID | The OAuth2 / OIDC Client Identifier issued by your identity provider console. |
| Client Secret | The secure Client Secret generated for Tensoract in your IdP application settings. |
| Callback URL | Pre-filled by Tensoract. You must register this exact URI in your IdP's authorized Redirect URI / Callback URL list. |
| Allow Auto Provision | Enable this toggle to automatically provision Tensoract user profiles upon first successful corporate SSO authentication. |
| Default Role | Select the initial role (e.g. Annotator or Project Viewer) assigned to automatically created SSO accounts. |
Click Add to save and activate the SSO provider configuration.
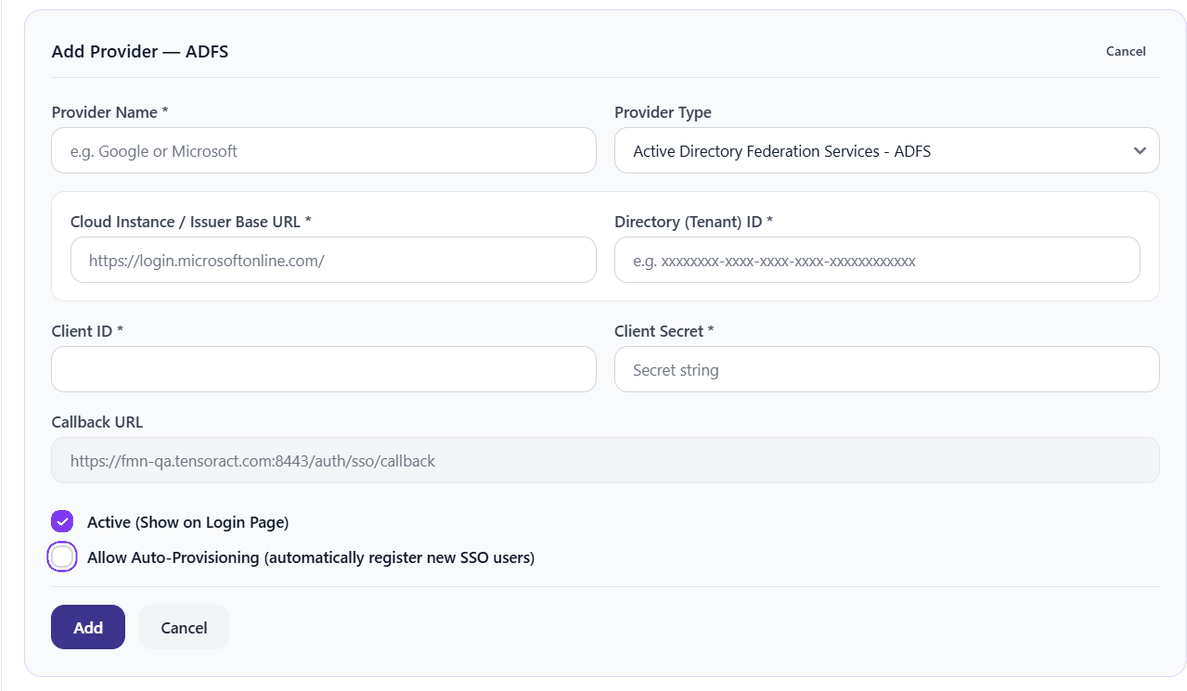
Figure 56: SSO - Add Provider Form
Step-by-Step Guide for Signing In via SSO
Click Sign in with SSO
On the primary Tensoract Login page, click the Sign in with SSO button positioned beneath the standard password form.
Select your Identity Provider
A modal window displays all SSO providers configured for your company workspace. Click Continue with [Provider Name] (e.g. Continue with Microsoft).
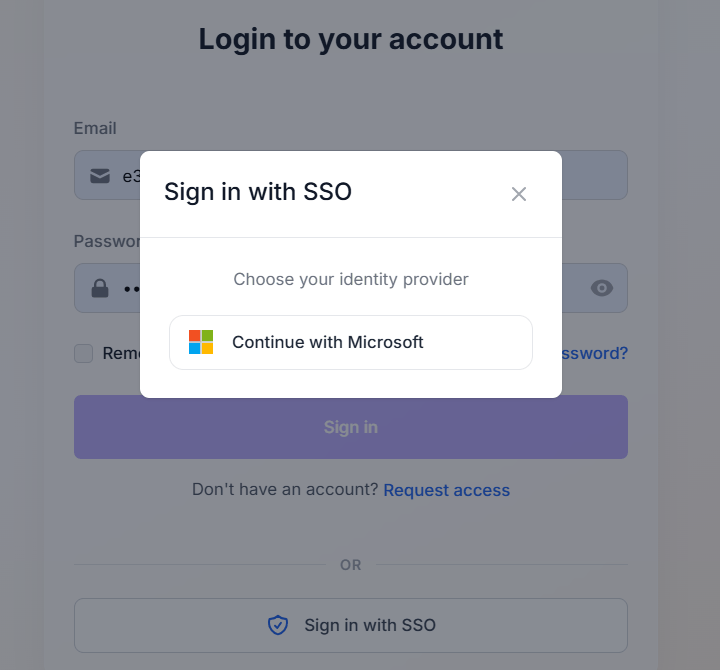
Figure 57: Login Page - Sign in with SSO Modal
Authenticate with Corporate Credentials
You will be redirected to your organization's external SSO login portal. Enter your corporate credentials and complete any organizational MFA challenges.
Redirected to Tensoract
Upon successful authentication, the IdP sends a signed token back to Tensoract, and you are automatically signed in and routed to your dashboard.

Figure 58: Tensoract Dashboard After Successful SSO Login